How to install ChangeSender
ChangeSender actually consists of two parts: The server components and the client component or Outlook add-in.
The Outlook add-in is the part that actually displays the “Send-as” selection box in each e-mail dialog. It takes that information and while it can’t actually change the sender (because Exchange would prohibit that) it does add this information to a special field in the email. The Outlook component must be installed on the client computer of each user who needs to use the Send-as function.
The server component then takes that information out of the special field and changes the sender to the one selected in the Outlook add-in after Exchange processed the email.
This component is installed only once, on the Exchange server.
In addition to this main job the server component also includes a small utility to restrict the usage of email addresses by the individual users. This “Configure ChangeSender and Client Restrictions” tool allows the Administrator to specify for each user whether that user can choose an address
- only from their email addresses configured in the ActiveDirectory. This is the default. OR
- freely edit the list of available addresses: Add new addresses or remove addresses originally present in the AD so they are no longer available for the user to choose from
- allow or disallow the user to add any address they like with no restrictions.
Both parts – the server component on the Exchange server and the client component on the individual user’s systems need to be installed for ChangeSender to work:
1. Installing the server component
To install the server component please download the self-extracting installer and execute it on the server while being logged in as Administrator. The installer will install these parts:
- The Exchange outgoing email handler that actually changes the address
- The “Configure ChangeSender and Client Restrictions” tool for configuring which addresses can be used by the individual users.
The installation usually does not require a reboot, except if the “Exchange transport” service is very busy during installation and is thus kept from restarting.
After installation you can use the “Configure ChangeSender Client Restrictions” tool to control usage of email addresses by your users by generating a configuration file that is then imported by the ChangeSender Outlook add-in on the client.
2. Installing the Outlook add-in
To install the client component please download the ChangeSender client component self-extracting installer and execute it on the clients computer. It is best to do this with Outlook not running during the install.
If you kept Outlook running during the install you need to shut that down and restart it again to see the new “Send-as” box in the email forms:

As you can see in this screenshot of the Outlook 2010 new email form a new “Send as” toolbar appears in all email forms. The default address is displayed in a selection box and you can use the arrow symbol next to that to show and select from the other possible email addresses.
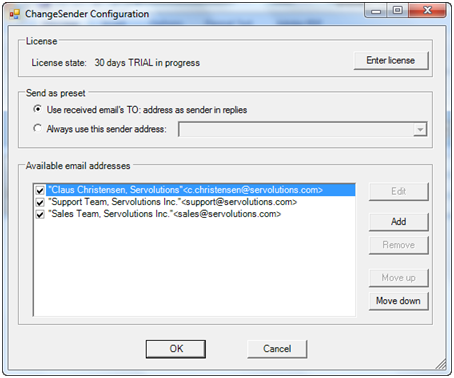
The properties symbol next to the send-as selection box allows you to administrate the ChangeSender add-in:

You can select which of the available email addresses (read from the ActiveDirectory) should show up in the selection box and also edit the “Name” part of the address. By default Exchange will name all email addresses the same, usually “First-Name Last-name”. But with ChangeSender you can have different name parts for different addresses. Like “Sales Team, company name” for the sales@yourcompany.com address and just “Company name” for the info@yourcompany.com.
In those cases where the Administrator allowed the use of any address the “Add” button shows up in the configuration and you can enter additional email addresses here.
After configuring the ChangeSender client you can immediately start to use it. Just select an address and send off the email as usual!